Baked with Love Baby Card

Hi Friends!

Many people that I know are at the stage of life of getting engaged, married, and having babies! Today, I made a card using Lawn Fawn’s Baked with Love stamp set to create a one layer card although the main panel is raised up on foam. I can’t seem to make a card without foam! Heh.

IMG_0193

• I began this card by grabbing one of my pre-cut card bases (Yay, Kinko’s! 👍🏼) and folding it to create a top folding card.
• I die cut the blue polka dotted paper from DCWV’s Basics Printed Stack using the largest die of the Large Stitched Rectangles set. I adhered it using a tape adhesive.
• I used the second largest stitched rectangle die using white cardstock and white foam. I stamped the cupcake first, masked it off, stamped the cake stand, and then stamped the sentiment last. I colored in the images using Copic markers and added shadows with the C1 marker.
• I trimmed off the top and right side of the foam piece to make it easier to disguise behind the main panel and glued them all to the card base using a liquid glue.

IMG_0195

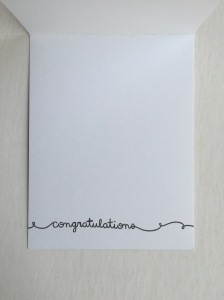
On the inside, I stamped the scripty congratulations for a simple finishing touch. Clean and simple 🙂

*Side note: I ended up writing in it and giving it away to a special recipient 🙂 I went The Nive Nulls’ meet up during VidCon 2015. I wrote to the Nulls to congratulate them as they welcome Baby BlahBlahBlah 🙂 It’ll be so awesome to read back on this post after we get to meet him and learn his name!

Thanks for stopping by!
Sharon 💕

Lawnscaping Challenge No. 110

Hi friends!

I love the current Lawnscaping challenge! It’s all about colorful rainbows.

10730786_10205213003590492_4598171741834080125_n

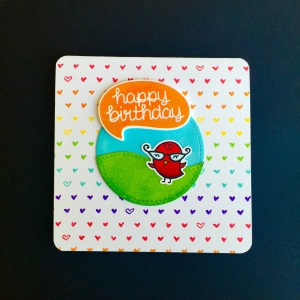
Here is my colorful rainbow-esque card 💕

FullSizeRender

I am still in the process of trying to use as many pre-stamped, colored, and die cut images from my stash. Therefore a lot of the images are from releases long ago.
• I created the center by distressing the stitched circle die from Lawn Fawn’s Stitched Party Banners using Tumbled Glass distress ink. The hill, bird, and speech bubble were pre-made, but I die cut the speech bubble once more from foam tape to create a solid base.
• I stamped two rows of hearts in a rainbow pattern. I used Memento’s Rose Bud, Lawn Fawn’s Fake Tan, Lawn Fawn’s Sunflower, Lawn Fawn’s Freshly Cut Grass, Lawn Fawn’s Mermaid, and Memento’s Grape Jelly inks.

IMG_1153

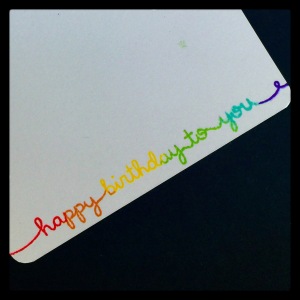
• I stamped the sentiment on the inside using the same inks. The sentiment is from Lawn Fawn’s Scripty Sayings stamp set. The most difficult part was trying to get a solid image of the green and blue ink.

Overall it was a pretty simple and quick card to make. 🙂

Thanks for stopping by!
Sharon 💕

#tbt to the Happy Baathday Sheep!

Hi Friends!

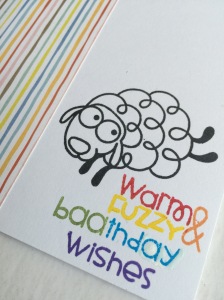
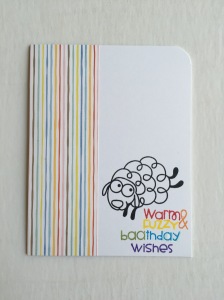
I have a very punny card for you today! This card was made quite a while ago.. I don’t even remember when I made it! Hmm.. Anywho, this was a relatively simple card.

PS baathday 2 PS baathday

• I began by creating my card base using Neenah Solar White 110 lb. cardstock. The colorful patterned paper is from an old 6×6 paper pad by My Mind’s Eye called Hootenanny. I used one of my scraps to create the side panel 😎
• The sentiment was definitely the most labor intensive part of the card as I don’t like to cut apart my stamps unless absolutely necessary. I used the masking or selective inking technique. 🙂
• For the “warm & fuzzy” sentiment I used Memento Lady Bug dye ink, Hero Arts Orange Soda ink, and Memento Luxe Dandelion pigment ink.
• For the word “baathday,” I used Memento Bamboo Leaves dye ink and Memento Bahama Blue dye ink.
• For the word “wishes,” I used Memento Grape Jelly dye ink.
• Lastly, I stamped the sheep. I didn’t add any shading to it, but I think I may now go back and do so. I didn’t know how to subtly shade it back then.. Actually, I don’t think I even noticed that it looks flat. 😅
• After all the stamping was done and dried, I went back with my Uni-ball Signo Broad White gel pen to clean up the sentiment. It still isn’t as clean as I’d like, but it’s okay (or so I tell myself 😁). Gotta choose your battles, yeah?
• I chomped the top right corner using the half inch side of the We R Memory Keepers corner chomper to balance out all the white space.

Yay! Simple card! I hope you enjoyed.

Thanks for stopping by!
Sharon 💕

#tbt to the Cheeky Birthday Monster ;]

Hi Friends!

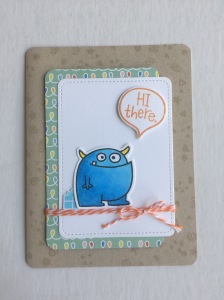
I’ve gone back to my first Paper Smooches image stamp set. My actual first Paper Smooches stamp set was Alphadot. Still one of my favorites! 💖 I’ve used them so much that no amount of washing with soap makes it cling again! 😢 I created a birthday card using one of Chari’s (of MossyMade.com) layouts when she was showcasing Lawn Fawn’s Science of Love back during Inspiration Week in December 2013.

IMG_0199

• To begin, I cut my A2 card base using Neenah Desert Storm 80 lb cardstock and randomly stamped the confetti images 🎉 from Lawn Fawn’s Birthday Tags stamp set. I wanted a subtle background, so I used the Versamark clear sticky ink to create watermarks.
• I used partial the die cutting technique to create a longer stitched journaling card using patterned paper from an old 6×6 paper pad from My Mind’s Eye called Hootenanny (😄 Such a funny name) and another using Neenah Solar White cardstock.
• I stamped and die cut the monster from Paper Smooches’ Falling For You stamp set. He was colored using B00, B12, and B14 (maybe even B16).
• I stamped the present using Hero Arts Soft Pool ink and die cut it out. 🎁
• Lastly, I stamped the sentiment using Hero Arts 🍊 Soda ink and also die cut it out.

ASSEMBLY
• I first glued the monster down using my trusty pink ATG gun. 💖 Then, I tucked the present  behind him. I love the goofy look on his face!
• I then popped up the sentiment using foam tape and adhered the two panels directly to each other. Next, I tied the twine under the monster to make him not look like he’s floating, also known as grounding or anchoring him.
• I decided to add extra dimension by popping up the panels and chomped all the four corners using the quarter inch chomper to mimic the rounded corners of the panels. 😉

IMG_0201
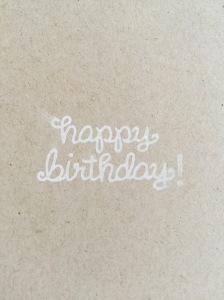
 I finished everything off by stamping “happy birthday!” on the inside of the card using a white pigment ink 😀

That finishes off the card for today! Thank you so much for stopping by!
Sharon 💕

✨Sparkle & Shine✨ with Lawnscaping Challenge No. 109

Hi Friends!

I’m here to share with you my take on the current Lawnscaping Challenge! 🌱

1920416_10205213003230483_6087235880717357886_n

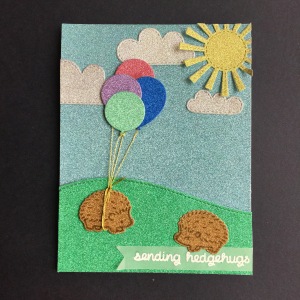
It said Sparkle and Shine, so I RAN with it! 🏃🏻😂 (Warning ⚠️: Get ready!) I love that when you look at it from afar it can look like a “normal” card, but take it to the light and all the bling can almost blind you! ✨😎

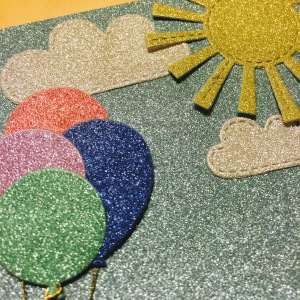
IMG_1011  FullSizeRender 9

• I began this card by die cutting or trimming down all of the elements using my Cuttlebug or Fiskars paper trimmer. All the glitter paper used came from DCWV’s The Cardstock Stack: Glitzy Glitter or The Glitzy Pastels Stack. ✨
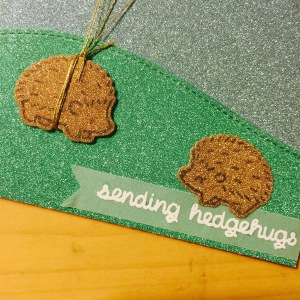
• Most of the card is pretty straight forward, but one of the experimental parts of this card was stamping on the glitter paper. I used Versafine Onyx Black, and it worked quite well. It seemed to take longer to dry on glitter paper than regular cardstock. I had second generation stamped hedgehogs all over my hands by the end of the project. 😁 I like how all of the stamping off created a tone on tone look. It almost looks as though I stamped it with a brown ink. 💕

FullSizeRender 8
• The other part of the card that was not as straightforward was all the fiddling done with the DMC metallic gold thread. It was a bit difficult as the thread frayed quite a lot. The knot on the blue balloon fell off, and I had to tuck it under using my Multi Medium Matte (or M&M&M as Laura Bassen would say! 😂)

Overall, I like how this card turned out especially given that it was my first time using this much glitter paper!

Thanks for stopping by!
Sharon 💕

You Are My ⚓️

Hi Friends!

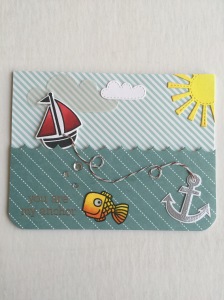
I’m here to share with you a nautical card. I mostly used patterned paper to cover the front of the card. I love how the two patterns are similar yet different at the same time.

IMG_0207 IMG_0209

• To begin, I trimmed a piece of the sky panel from a 4×6 paper pad from Martha Stewart Crafts. The water panel was trimmed using a pattern from DCWV’s Basics Printed 6×6 stack. I created the waves using the middle sized stitched scallop die from Lawn Fawn.
• I die cut the sun out of regular yellow cardstock, the small cloud using white cardstock, and the large cloud using vellum.
• I stamped the fish from Paper Smooches’ Birthday Buddies stamp set. I colored him in using Y08, YR15, and YR68. I fussy cut him out and then outlined him using my Tuxedo Black marker. I added glossy accents to his eye for a little more detail. 😉
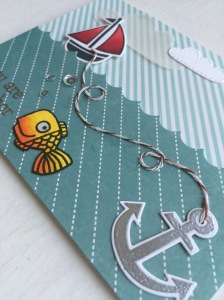
• I stamped the boat, colored the sails (R35, R29, R59), and die cut it using the coordinating die cuts. I made a hole with my 1/16″ hole punch and threaded my twine through it. I heat embossed the anchor using a silver embossing powder from Recollections and die cut it out. While I had all my heat embossing stuff out, I decided to emboss my sentiment also. 🙂

Assembly time!
• I first adhered the sky to the card base using my ATG. Then I popped up the water panel using foam tape.
• I also adhered the sun and then cut off all the rays that were hanging off the edge. I added my little fish once the glossy accents was dry.
• The trickiest part was trying to get the twine to rest in a whimsical and loopy way. 😛 I didn’t originally intend to create loops, but the twine was too long and later figured it’d look cuter with the loops. I first popped up the boat on foam tape and tucked it behind the waves. I covered the twine with Ranger’s Multi Medium Matte (<3 love this stuff!) I fiddled with it so much I had to add another coat of glue before I got it where I wanted it haha. Trial and error, friends!
• Once I got that little sucker in place, I added my clouds and Pretty Pink Posh 4mm and 6mm sparkling clear sequins. For my last step, I rounded the bottom corners using the half inch side of the corner chomper. 😀

And that’s it! Thanks for stopping by!
Sharon 💕

Lawn Fawn Galore with Mr. Robot Kimbap

Hi Friends!

I have two cards that I want to share with you today. I’ve already shared the first one over on my Instagram (@sharonstamped), but I also wanted to give you the breakdown. Oh, side note – “kimbap” is the Korean word for seaweed wrapped rice with other meats and veggies. 😛

These two cards included a lot of trial and error.. gluing, peeling, gluing, drawing, erasing.. 😅 I’m so happy with the results though… especially the second one ☺️👌🏼

FullSizeRender 5

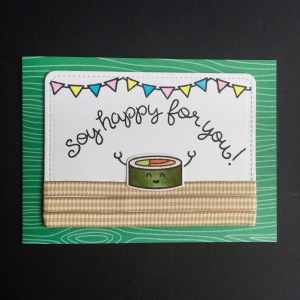
• I began my card by die cutting the white panel using Lawn Fawn’s Stitched Journaling Card. Then, I stamped the sentiment and the smiley face on the pre-colored kimbap from Lawn Fawn’s Let’s Roll set.
• I used YG63 as my lightest shade, G85 as my middle shade, and G99 as my darkest shade for the seaweed. I colored the inside using YG03, YR12, and YR68 and added dots of W1 for the rice.
• I then positioned the kimbap and selectively inked up each of the robot’s arms, stamped them, and glued down the kimbap. I then realized that it looked like it was floating. I peeled up the bottom of the image and tucked some ribbon that I got from @mayholicincrafts over on Instagram under it using my ATG gun to create a table. It’s the gingham check vintage beige ribbon from All My Memories.
• Next, I stamped and colored the banner from Lawn Fawn’s Birthday Tags stamp set. I used RV02, Y04, and BG02. Lastly, I popped up the whole panel onto a Spruce 4-bar Lawn Fawn notecard using foam tape! 😀

Now.. on to the more labor intensive but equally cool card 😎

FullSizeRender 6

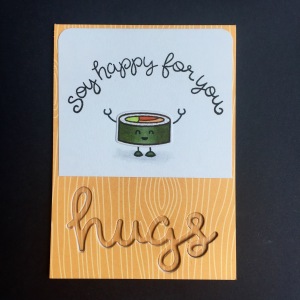
• This card definitely just had a life of its own. I just went along for the ride. 😉 When I originally had the idea to add arms to the sushi, I did it on a scrap piece of paper. I tried to die cut it out with the stitched journaling card, but I couldn’t get it centered correctly which is why I created a whole other one for the first card.
•As I was gluing down the ribbon to ground the image, a 💡 turned on! FEET! 👣I again peeled up the kimbap and stamped the feet. I colored them using YG67 and G99. I added the shadow using C1 and 0 (Colorless Blender).
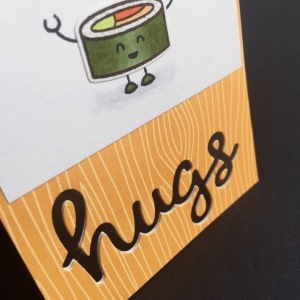
• I didn’t want to have it go to waste so I trimmed it down, chomped the corners, and adhered it to the front of a Lawn Fawn 4-bar Butternut notecard.
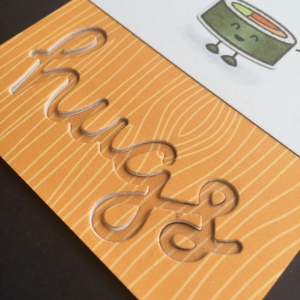
• I originally planned to have it say “Soy happy for you, love” using the Scripty Love die, but realized that I could use “hugs” for happy occasions. I wanted to inlay the word on the inside of the card but didn’t know how I was going to adhere the negative spots from the word on the front of the card. I again went with my “What’s the worst that can happen?” mentality and die cut the word out anyways. I then glued down the word on the inside of the card using my Zig 2 Way Glue ballpoint pen. I sat there trying to figure it all out. Answer? Acetate.✌🏼

IMG_0995    FullSizeRender 7

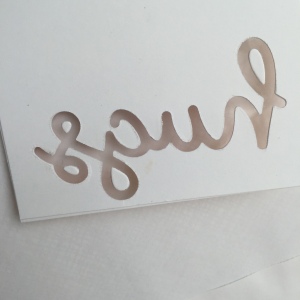
I cut a panel out of acetate and adhered it to the inside of the card. I realized that I would have to hide all the adhesive, so I cut out another panel out of white cardstock. I die cut the word “hugs” once more to also add the negative spaces of the word on the inside. I used my ATG gun to adhere the larger parts of the panel and Glossy Accents to adhere the smaller bits.

IMG_0997

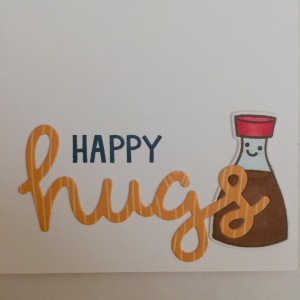
For the inside of the card, I stamped the “happy” from Lawn Fawn’s Sweater Weather stamp set using Lawn Fawn. It still looked a bit empty, and I wanted something a little cheekier. 😄 I wanted to add a soy sauce bottle with a smiley face behind the word, but I already glued it down using liquid glue so I die cut the word “hugs” out of it and filled in the missing pieces 🙂

FullSizeRender 4

WHEW! This is quite a wordy post. Thank you for having stuck it out with me until the end! Overall, I am so happy to have my creativity back, and I will not take a messy craft desk for granted again!

Thanks for stopping by!
Sharon 💕

…and the creative juices are flowing again!

Hi friends!

I’m so happy to say that I completed Kathy Racoosin’s The Daily Marker challenge in June! 💪🏼 I heard about the first challenge back in March, but I didn’t want to make the commitment. I had so much fun and wish I hadn’t sat out on the first challenge. I’m now in love with it, and I cannot wait for the next one! 😀

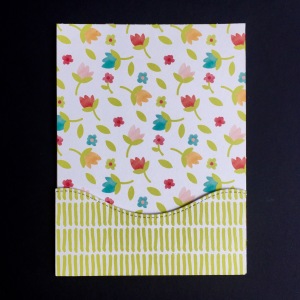
With that said, I have to admit that it left me in a bit of a creative funk. 😑 I got into the groove of coloring but never got around to creating a finished product for over a month! Anywho, I was determined to make something and just grabbed a few packs of my 6×6 paper pads. I went back to my trusty CAS(E) This Sketch blog and created this:

FullSizeRender 3

I used two patterned papers from American Crafts’ Color Crush 6×6 pad. I think it’s been discontinued.. It’s one of the oldest little paper pads I have. I also used one of the squigglier dies from Lawn Fawn’s Hillside Borders. Heh, this one is still unfinished. I wish I had a large butterfly die to finish it off… Hmm…

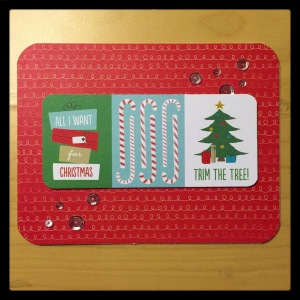
I set it aside and moved on to a Christmas paper pad (also by American Crafts) that I bought at Target last Christmas. It’s just called “Holiday.” Very original, haha. I then created this card:

IMG_0985

This one was made using just a paper trimmer, a corner chomper, and some foam tape. 😁 I did go back after and added some Pretty Pink Posh sparkling clear sequins (4mm, 6mm, and 8mm) using Ranger’s Multi Matte Medium. Lastly, I dug into my overflowing stash from the coloring challenge to create a card. 🙂

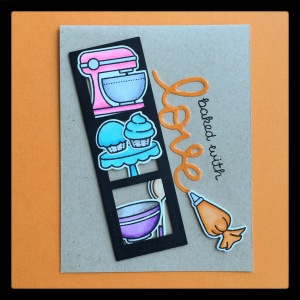
IMG_0987

• I die cut the film strip and arranged and rearranged the images.
• I decided I wanted to emphasize “love” in “baked with love,” so I then die cut the word “love” and adhered it down. I stamped the “baked with” using Versafine Onyx black pigment ink.
• I covered the “love” with Glossy Accents and the two cupcake frostings with Wink of Stella.
• I popped up the piping bag using foam tape and carefully stuck it at the end of the “e.”

Yay! I won’t take a messy craft desk for granted anymore 🙂

Thanks for stopping by!
Sharon 💕

#tbt to December 2014

Hi friends!

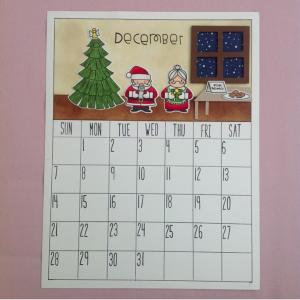
Wow! This went by so fast! I’m here to share with you the LAST post of my calendar series! To be absolutely honest, I was very burnt out by the end of the series which is why I haven’t made one for 2015, but I really want to do another calendar series. We’ll see… 😉
IMG_0880

I had the idea for this one for a while before December 🙂

The Basics
• To begin, I used my T-square ruler to draw all the lines with whatever black pen I had (more often than not it was with a Sharpie fine point pen, black Pilot pens, or Sakura Micron pens) and stamped the days of the week and dates using Lawn Fawn’s Milo’s ABC’s. Now, on to the fun part~
• I began by masking off the top panel (leaving out about an inch or an inch and a quarter or so off the bottom) and distressing it using Antique Linen distress ink. I distressed the bottom part using Gathered Twigs.
• I stamped and die cut Santa Claus, Mrs. Claus, Christmas tree, topper, glass of milk, present, note for Santa, and plate of cookies using Tuxedo Memento Black ink. I set everything aside and focused first on my people 🙂

Santa Claus & Mrs. Claus
• I colored Santa and Mrs. Claus using R35, R29, and R59. Warm grays (W1, W3, and 0 – the colorless blender, my then new favorite) were used to color in Santa’s beard, Mrs. Claus’ cute bun and collar, and their mittens. Their skin was colored using E00 and E11.
• I used Y08 for Santa’s belt buckle. I went out of the lines a couple of times with Santa, so I covered it up using the Signo Broad white gel pen. Those darn Copic reds bleed so easily! 😠
• I colored Mrs. Claus’ apron using YG07. I didn’t bother to shade it because most of it was going to be covered by the present. 🎁 I also colored in her glasses with B0000 and coated it with Wink of Stella before topping it off with some Glossy Accents.
• I stamped four extra mittens and fussy cut them after coloring them the same way with warm grays.

The 🎄 & Topper
• I feathered in streaks of YG85 before coloring the whole Christmas tree using YG63.
• I used YG08 and B0000 on the topper before making it shiny and pretty using the Wink of Stella.

The Table, Note, and Cookies
• I wanted a woodgrain texture to the table, but my embossing folder and Lawn Fawn’s Woodgrain Backdrops were too large for my small table. I dug out one of my Hero Arts wood mounted background rubber stamps. I stamped it using Versamark ink which just leaves a watermark or a tone on tone look. I cut all the pieces using my paper trimmer for a guaranteed straight edge. 🙂
• I used W1, W3, and W5 to add dimension to the note. 🙂
• I colored the cookies using E35. I think I forgot to color the plate. I may just go in now and add some warm grays to it. 😁

The Window, Glass of Milk, and Present
• I die cut one brown square and one white square using the Square Spellbinders Nestabilities. I cut four squares out of the brown frame using the smallest square to create the window. I then trimmed off a little bit off of the white piece to make it easier to hide behind the frame later. I distressed it using Chipped Sapphire and added my snow using the Signo Broad white gel pen. I adhered the frame down by cutting the skinniest pieces of foam tape.
• For the glass of milk, I colored the glass part with B0000, covered it in Wink of Stella and Glossy Accents, and fussy cut it.
• The present was colored using YG09, and the ribbon was colored using Y08 and Y19.

Assembly
• I first adhered down the Christmas tree, the topper, Santa, Mrs. Clause, and the window flush against the calendar.
• I used foam tape to pop up the tabletop and “front” leg. I then tucked the “back” leg using my Zig glue pen and EK Success tweezers (my lifesaver!) I then added the note to Santa and plate of cookies to the table.
• Once I had all my images situated, I stamped “December” using Versafine Onyx Black pigment ink and Paper Smooches’ Alphadot.
• I gave Santa and Mrs. Clause their things to hold and then popped up the extra gloves using foam tape.

And this is how it ends! 👏🏼👏🏼👏🏼 Yay! Hopefully I will continue to have a lot to share (and actually get around to sharing) with you on my blog!

Thanks for stopping by!
Sharon 💕
Happy weekend!

Happy Saturday, friends!

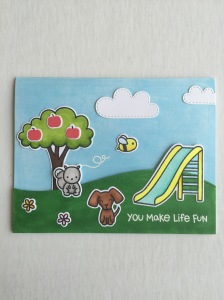
I have a lovely friendship card using Lawn Fawn’s Let’s Play stamp set for you today. 🙂

IMG_0203

• I began by stamping, coloring, and die cutting the tree (YG13, YG25, E59, E77), slide (Y04, Y08, BG13), squirrel (W1, W3), and flowers (Y08, YR12, R00, RV02). The dog, Penny (named after Chari’s Penny), was inked up, but her eyes were wiped off, stamped, and then replaced using a face from Let’s Roll. She was colored using E57 and E59.
• Next, I stamped, colored, and die cut the bee from Hello Sunshine. Again, Y04 and Y08 were used on the body. The wings were colored using B0000 and coated with some Wink of Stella. The clouds were die cut from the Spring Showers die set.
• The “apples” were stamped using Memento’s Lady Bug dye ink. I wiped off the stem before stamping them and drew them in using the Gathered Twigs distress ink marker. And then, of course, die cut.
• I then die cut the hill using Stitched Hillside Borders and distressed it using Mowed Lawn. I also distressed the top 2/3rds of the card base using Tumbled Glass for the sky.

Now for the assembly and finishing touches!
• I first laid everything out. I decided to pop up the hill using foam tape, so I went ahead and heat embossed the sentiment on the bottom right using Hero Arts white embossing powder and adhered the dog and flowers on the hill using tape adhesive.
• I then adhered the squirrel and slide to the hill panel using tape runner and added some foam tape toward the top. I then went back with my B00 and G09 markers to color in the white space in between the ladder rungs. 🙂 I added the whole panel to the card base.
• I tucked the tree behind the hill and added the apples on the tree and clouds in the sky. I adhered the bee next and then decided to heat emboss a loopy flight pattern 🙂

That finishes up the card for today!

Thanks for stopping by!
Sharon 💕